
This came to be on a larp thread in /tg/.
I am merely saving it on a better platform.
Heh. Last thread went on account of it's participants going to sleep- I was out around 1AM EST US time.
Annnnyway:
Visuals. Why do they matter when we can just imagine the guy in a
tabard and facepaint as an orc? Heck, where does that point of view come
from?
I've found that where it comes from is, quite simply
people who've never experienced it. When you're used to riding horses at
a full gallop, it's a rush- but when you get on a motorcycle the first
time and start going a mile-a-minute, it's a unique experience. Both are
a speed rush, but the second one just gives you that "goin' fast"
feeling at a level the horse can't.
Most US LARPers are used to the horse. It's all they have to ride, it
can get you there, and it's fun when you kick it into gear. You've got
your boffers, you've got your basic costuming, and that's how they ride.
By
comaprison, the "internal combustion" age of LARPing started in England
in the late 80's, spread rapidly out from there, and ended up a
standard passed from one group to another that now extends from there to
the outer edges of what used to be the Warsaw Pact. Along with it came
never really having the foam-fighting lot that shit all over the idea of
actually dressing up for hitting each other with plumbing supplies. And
instead of D&D, the big gaming influences were...Warhammer.
I've
seen pictures of late-80's/early 90's LARPers from both sides of the
pond. They look almost identical. But the later influences rapidly
change that. Pic related, this kinda thing is our "common ancestor"
LARP-wise, before environmental issues changed- and wouldn't look out of
place in some countries today where LARPing is just getting started.
US LARPers had their influences come from what was around them-
foam-fighting groups and the SCA, plus the ubiquitous Renaissance Fairs
that are pretty much a USA thing. Foam-fighters insured that the boffer
would remain the dominant LARP weapon pretty much forever, and refine
that into the kitespar-feather-club ultralights to boot. SCAdians helped
make sure that armor would be functional before looking good. D&D
meant that a high-magic system was the big draw, that a guy in a robe
was dangerous on account of being a walking rocket launcher with beanbag
missiles-o-doom (at least until he was out of spells, then he was a
useless piece of meat). Cheap and thrifty and doing as little as
possible was considered a virtue- and even the combat systems often
evolved along those lines, rendering armor that took time, effort and/or
money relatively useless vs. magic- a lot like D&D fighters vs.
D&D mages, when you think about it. What good costuming did come
along was from people who crossed their LARP with their Renfair/SCA garb
whoring/con costuming -but since those people were used to social
situations where the guy in fugly combat armor was having dinner next to
the lady in fancy dress, it carried over to LARPing. In the US, you can
still see it to this day- women tend to have a higher visual standard
by far than the guys do...unless the lady in question is dressing up the
guy.
Meanwhile, overseas you're getting completely different influences. A
combination of medieval era re-enactors (the equivalent US ones are busy
playing 1700-1800's era wargames and barely make a blip on the LARP
scene) and FX-minded folks (the UK's ranks for "holy shit, that's an
awesome monster" gear include notable FX guys who did BBC work from the
80's onwards) drive a demand to get rid of the boffer weapon. They come
up with the first latex weapons and suddenly, you have multiple crafters
trying to outdo each other in making awesome-looking latex weapons.
Costuming already has the support of said re-enactment types, and the
stronger FX-maker influence also means you see much more of what the US
would call "cosplay" getting into the mix- not only do you see more
realistic armor getting into LARP, but you also see "wonderflex" and
other theater-style prop armor bits and accessories going in alongside
the latex weaponry they're busy hitting each other with in the woods and
caves (and occasional old castles).
In addition, the fantasy gaming system in Europe that's big isn't
D&D. It's Warhammer, with it's strong visuals and a much more "melee
matters and does the hard work, magic is for special stuff" view of
things. The "lightning bolt" as US LARPers know it never takes off, with
more point-and-shoot and considerably less of it being hurled around.
And standards being much higher, the visuals...well, they end up being
up there as well.
US LARP ends up following along it's ancestor's lines- small "chapters"
and groups all over the place that rarely get together. EU LARP tends
more along the lines of re-enactor groups, happily forming the first
"festival" LARPs- games easily approaching 1000 people, then later
nearing 10,000 with the international fests like Drachenfest. The
closest US equivalent are the SCA (Pennsic being most notable and of
similar size, with smaller multi-thousand-population "wars" scattered
around the US along with similar slightly smaller efforts from
Amtgard/Dagorhir), but LARP size in the US generally stabilizes at the
"small group" level, falling from a maximum of 300 or so in the early
90's to a mass scattering of 150 or less in the modern day. Indoor
(convention/Mind's Eye Theatre-aka-vampire-LARP) games sit at much the
same levels, only without any real continuity most of them simply come
and go and make no long-term impact- but are actually more common than
the outdoor LARPs for a fair bit of time thanks to the ease of venue and
relative informality of play. To whit, you can find a vampire LARP in
pretty much easy driving distance over much of the US. (Good luck with
that overseas.)
Meanwhile, as the European LARP scene is developing, the US one pretty
much falls into a near-stasis for over a decade. PVC boffers are still
common, but the more competitive begin to experiment with kitespar and
other similar supplies to create something that hits faster and safe by
US standards. The UL weapon begins to show up in significant numbers,
but to this day this pic wouldn't be out of place at your average US
LARP event.
It's worth noting that it's not ALL totally frozen in place in the US.
The first cracks in the ice actually date back to 2000 or so, when you
started seeing a very few latex weapons imported over, along with the
occasional group of folks that had started with European LARPing and
brought that mindset over to the US. In addition, a certain amount of
backlash develops over the years, dribbling out new, small games on a
regular basis. Most of these end up being near-clones of the old 1990's
style games, but the occasional group innovates or forms more
rules-light systems. Accelerant is the most widely used
second-generation rules system, but individual examples exist up and
down the East Coast in respectable numbers. While relatively unpopular,
there's even attempts at science-fictionish or post-apoc games: in the
US, an early example is the Future Imperfect events run by Mythical
Journeys, one of the more creative offshoots of the 1990's LARP fantasy
generation that's still active to this day. Games like Freefall or
Dystopia Rising are more recent additions to the list, along with
attempts to build Fallout in LARP format. (and it's notable that such
efforts are oft mirrored overseas, up to and including a long-going 40K
LARP in the UK, or at least one truly badass Fallout LARP in Russia.)
While it's notable that the oldest LARP orgs in the US are AWARE of what
it's like elsewhere, it's not something that gets brought up much until
very recently. A good chunk of NERO's bigwigs ended up at Mythodea back
in 2005 (and proceeded to botch horribly a copycat event in the US
shortly afterwards, utterly souring Mythodea's staff towards reaching
overseas), and the occasional US LARPer makes the trip over to the
UK/Germany (military types, commonly) and gets a taste of how they do it
on the other side of the Atlantic.
There are no serious
producers of latex gear in the US. Zero. Calmacil is Canadian (and go
figure, you have Biccoline and such there, along with stuff that'd
easily resemble US games as they've always been), and 99.9999% of LARP
gear in the US is repurposed in some fashion- from Ren Faire costumers
and pouches and such through imported LARP-safe weaponry from the EU or
Canada, and since imports are oft marked up + the US penchant for
"thrifty" (read: cheap as possible) gear...the well-equipped LARPer is a
rare bird outside of long-established games, and even then the
competitive bent of many of them encourages and allows for people to put
the good-looking sword down, grab a UL club-sword and feel socially
better about it cause they chose effectiveness over actually wielding or
wearing something that looked neat- because performance still rules in
most parts of the US over anything else. (Except cost- it'll either be
cheap, or it'll be effective, but rarely does the idea of "gee, I'm
wearing pickle barrel armor and swinging a kitespar dicksword" trouble
the US gamer.)
The smaller group sizes and standards also means
that just -getting- a business with a viable market is difficult at
best- meaning the hordes of small business types that pop up in the UK
or Germany along with the bigger ones (like Mytholon or Atlier) simply
never find ground to take root and get started. Their equivalents in the
US resell EU gear.
By comparison, you'll see plenty of SCA merchants and armorers-
which means it's actually far easier to find functional 14-16ga metal
armor sold than 18-20ga LARP-style armor- and likewise, even leather (or
plastic!) After all, they're more established and have been needed
(since minimum standards for SCA require it) for decades longer, and
even then are so in demand that most have weeks or months worth of
waiting list. Likewise, you can even find boffer-makers out there that
sell a steady stream of their product- but because latex is in much
lower demand, you don't see it being made domestically in the USA.
What would bring US visual standards up higher?
AVAILABILITY. And
that's not just "Oh, we can sell stuff we got overseas.". Personally, I
think it won't happen until someone in the highest-density LARP
population (that is, New England->PA) actually starts the equivalent
of a Skian Mohr, Having a LARP, or similar one-tent-vendor style
actually learns how to make proper production of latex weapons that are
soft enough to regularly pass US (who tend to be more sensitive towards
harder weapons) game standards- and starts going around selling
working-man's weaponry to the populace.
Because frankly, there's
good odds nowadays that you could end up ordering a weapon from
overseas, bringing it to an event and having it fail. Grats, you're out
$100- oh, and heck, you never even got a chance to hold the thing or
test swing it a few times to see if you liked it. Hope it looks good on
your wall.
Likewise less expensive LARP-grade armor. Most people
into armoring are immediately snagged by the SCA, where they're able to
sit there banging out SCA-grade armor with a guaranteed demand....much
less the machined, basically "munition-grade" armor you can find stacked
by the dozens at a German LARP vendor!
Showing posts with label boffer. Show all posts
Showing posts with label boffer. Show all posts
Monday, 20 May 2013
Tuesday, 12 February 2013
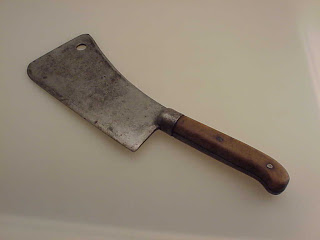
How to make a larp boffer meat cleaver.
In the previous blog post about improvised weapons, I showed a farming sickle. All that is well and good, but what other things come to mind in terms of everyday tools and items used as weapons? Let's see, lumberjack axe, blacksmith hammer, hunting bow, peasant pitchforks and flails...and a butcher's cleaver.
Its hard to argue with a 150kg butcher with a 2 foot long cleaver in one hand and a meat hook in the other. Or an equally big cook whom you've caught in his beloved kitchen while storming the castle so he naturally reaches for the first familiar choppy thing nearby...People don't generally keep swords and other stuff in the kitchen. No need - its a veritable arsenal already.
So - butcher's meat cleaver. What do we need? Eh not much really - same as usual.
 First we cut the necessary length for the core then we make the handle.
 The grip is similar to the one on the sickle, with the added exception - hemp string for looks.

After that the blade - which should be multi-layered.

To improve the looks - I added cardboard to the sides of it. Normally that hardens the blade, but in this case we are talking about a short weapon that's going to lack kinetic energy anyway, so we go for the looks.
 Finally - top layer of tape and we are done. We got a larp boffer meat cleaver.

Its hard to argue with a 150kg butcher with a 2 foot long cleaver in one hand and a meat hook in the other. Or an equally big cook whom you've caught in his beloved kitchen while storming the castle so he naturally reaches for the first familiar choppy thing nearby...People don't generally keep swords and other stuff in the kitchen. No need - its a veritable arsenal already.

So - butcher's meat cleaver. What do we need? Eh not much really - same as usual.


After that the blade - which should be multi-layered.

To improve the looks - I added cardboard to the sides of it. Normally that hardens the blade, but in this case we are talking about a short weapon that's going to lack kinetic energy anyway, so we go for the looks.


Tuesday, 15 January 2013
How to make a larp boffer roman gladius
The Roman gladius does hold a few more target specific points to be given a separate tutorial here.

 So what can be said about it in one sentence. If you are looking for a short stabbing sword meant for fighting with big shield in formation then you need a gladius. They come in several basic types, though most of the variation comes from blade shape which cannot be readily replicated. Size is between 60-70-80 sm long, depending on the type.

So Larp boffer Gladius - materials list
The usual gig - polypropylene pipe F25, tapes, foam, some glue and hemp string in this case.
The tools list is usual and so is the price tag attached. I'm not going to repeat it every single time after all.
 Now the specific point about the gladuis is that it's meant mostly for stabbing. Therefore the tip needs to be made a bit differently. First I'll soften the edges of the pipe so that they don't damage the foam tip. A champagne bottle cap could go there but I don't have one at the moment.

After that its grip making time. First I measure it and leave some room for error margin. After all the sword might go in bigger hands than mine.

Then its business as usual for my current larp sword making technique - the grip is made oval and the pommel goes in. Note that there is no additional counterweight this time, apart from the pommel itself. The gladius is fairly short and light so there is no need for it.

Usually at this point I add leather to the grip to improve handling. However I decided to do something else this time around.A bit of a cheaper alternative to be accurate.


 One extra layer of foam is added to the tip to soften it more. Both this and the previous step are made exactly with more stabbing in mind. A sharp tip will be flattened in no time anyway.
 Finally one thing the gladuis sometimes lacks - a sword guard. I made it from another piece of left over flip-flop foam. Nothing left to do now but cover the blade.
 All set - you can go stab someone now.


So Larp boffer Gladius - materials list
The usual gig - polypropylene pipe F25, tapes, foam, some glue and hemp string in this case.
The tools list is usual and so is the price tag attached. I'm not going to repeat it every single time after all.


After that its grip making time. First I measure it and leave some room for error margin. After all the sword might go in bigger hands than mine.

Then its business as usual for my current larp sword making technique - the grip is made oval and the pommel goes in. Note that there is no additional counterweight this time, apart from the pommel itself. The gladius is fairly short and light so there is no need for it.

Usually at this point I add leather to the grip to improve handling. However I decided to do something else this time around.A bit of a cheaper alternative to be accurate.

Simple hemp string is glued to the grip instead of leather. It works just as fine, but at a fraction of the cost.

Sometime later its done and one can start working on the blade itself.

In this case the blade is made a bit differently. Its again classic 2 foam layers, however the layers themselves are made from a single length of foam that goes around both ways.


Monday, 19 November 2012
Assasination weapons in LARP - the breast dagger
Every now and then you can find an idea in those fantasy tv serials that isn't as bad as the rest of it and can be applied to a larp. No, I'm not talking about chainmail battle bikini. This one will be the breast dagger from Xena the warrior princess. Yeah yeah, don't shoot now - think a bit. If poison cannot be used for various reasons - you still need a blade. And well, at any larp game that does not involve character sheets and dice, guards will quickly remove knives and daggers hidden in the usual places. That's why you need one hidden in a, well less usual place where they'd usually NOT look. And if they try to - you have all right to stop them. I don't have to mention that's a lady's weapon do I? Well just to make clear - its a small punch dagger for a lady to hide between her breasts.

Note: I made it a bit bigger than it should be. However since its has to be of a custom size to fit uuuh...well the user's hiding spots, it was better to make it bigger and THEN trim it out. That's why the grip is so plain too,I should decorate it a bit.
TOOLS - the usual
MATERIALS - 1 old flip-flop or a piece of tougher camp mat foam with the suitable shape, various duct tapes, old plastic bottles - grip decoration is optional.

First thing to do is cut out the rough shape of the dagger. Yeah I know what it looks like at this point, don't laugh.

After that, slowly start trimming and sharpening it until it reaches the desired shape and size.

Then its time to make the grip - plastic bottles are the material of choice for me. Nothing difficult here either.

Then its just adding the tapes and its finished. Decorating the grip is up to you. I decided against anything serious, since it will be trimmed down even more later on to fit a girl's hand, not mine.


And that's it, now nobody will feel safe around girls in larp. Not as if we did before...
Friday, 19 October 2012
How to make a basic larp boffer spear
Spears, halberds, poleaxes, and so on, are a bit more specific to make than one handed weapons obviously. Main issue is getting a good core for the job. When talking spears there are several types and sizes, that have different approach for them.
First are short one handed spears.

A short spear would not be much different from the javelins - in fact if you only follow the same guide but make it a bit bigger (f25 core and say 1.2-3sm size) and you will get a nice dual purpose weapon - stabbing spear that you can also throw when needed.
Next are full sized fighting spears - you can use those with either 1 hand or 2 hands but they are usually not suitable for throwing. This guide is about them.

Finally you got pikes - 3 meters+. Pikes are a dedicated formation weapon, making them would be a problematic, let alone finding enough people for a pikemen square. Never encountered it so I got nothing to say about pikes.

So how would you got about making your basic simple spear? First of all materials needed.
BUDGET: around 20$ - the large pipe is a bit expensive.
MATERIALS
Core is an F32 polypropilene pipe, a piece of foam, tapes and some wood textured wall paper to decorate the spear shaft.
Note. The problem with polypropilene for long weapons, is that the longer the core, the more wobbly it becomes, effectively giving the so called spaghetti spear effect. The simplest way to counter that is to use a thicker pipe for a longer weapon and it works to a point. For weapons up to 1 meter something - f20 and f25 pipes are ok, for up to 1.5 meters f 32 is ok, but for bigger, its not enough and the f40 diameter pipe is I'd say a bit too big. The wobbling in spears and polearms can be solved by inserting something else inside the core - basically that's why I postponed making the spear guide, I was looking for something suitable. Alas I found nothing so far so i'll show it in the polearm guides later on.
Tools are the usual for every larp weapon.
A spear is actually remarkably easy to make, finding a suitable core is harder.
First thing to do would be to prepare the spear shaft. The core is 2 meters long and a suitable piece of wallpaper is cut for it.

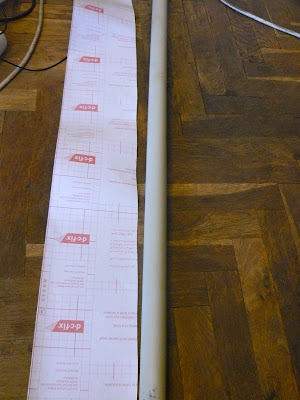
Here's the shaft in full size. Can't take photos of it elsewhere - its too long.
 The rear end I covered in tape. Some folks might turn it into a spike and thus make both ends of the spear useable, I'll pass on that for now.
Next thing to do is the spear head. NOTE This is a SPEAR - not a polearm, not a naginata - a SPEAR. Its meant for stabbing only, not cutting and slashing, so don't try to wallop the other guy over the head ok?
Now that we got that bit out of the way, back to the spearhead. Obviously, since you will be stabbing all the time, not occasionally as with swords, the head needs to be reinforced. You can't get away with something the size and thickness of a sword blade&tip.
 Thus the spearhead will be thicker and with a fortified tip - I got 3 layers of foam on it, and then the final one giving it the pointed shape.
 After the foam layers are placed on, the final two pieces are cut to give it a pointed edge. Not too much since constant use will flatten it anyway, just enough to make it look decent.
 With the spearhead finished you only need to cover it in tape and its done.


First are short one handed spears.

A short spear would not be much different from the javelins - in fact if you only follow the same guide but make it a bit bigger (f25 core and say 1.2-3sm size) and you will get a nice dual purpose weapon - stabbing spear that you can also throw when needed.
Next are full sized fighting spears - you can use those with either 1 hand or 2 hands but they are usually not suitable for throwing. This guide is about them.

Finally you got pikes - 3 meters+. Pikes are a dedicated formation weapon, making them would be a problematic, let alone finding enough people for a pikemen square. Never encountered it so I got nothing to say about pikes.

So how would you got about making your basic simple spear? First of all materials needed.
BUDGET: around 20$ - the large pipe is a bit expensive.
MATERIALS
Core is an F32 polypropilene pipe, a piece of foam, tapes and some wood textured wall paper to decorate the spear shaft.
Note. The problem with polypropilene for long weapons, is that the longer the core, the more wobbly it becomes, effectively giving the so called spaghetti spear effect. The simplest way to counter that is to use a thicker pipe for a longer weapon and it works to a point. For weapons up to 1 meter something - f20 and f25 pipes are ok, for up to 1.5 meters f 32 is ok, but for bigger, its not enough and the f40 diameter pipe is I'd say a bit too big. The wobbling in spears and polearms can be solved by inserting something else inside the core - basically that's why I postponed making the spear guide, I was looking for something suitable. Alas I found nothing so far so i'll show it in the polearm guides later on.
Tools are the usual for every larp weapon.
A spear is actually remarkably easy to make, finding a suitable core is harder.
First thing to do would be to prepare the spear shaft. The core is 2 meters long and a suitable piece of wallpaper is cut for it.

And then wrapped around....After all it should look like a spear right?

Here's the shaft in full size. Can't take photos of it elsewhere - its too long.


Next thing to do is the spear head. NOTE This is a SPEAR - not a polearm, not a naginata - a SPEAR. Its meant for stabbing only, not cutting and slashing, so don't try to wallop the other guy over the head ok?
Now that we got that bit out of the way, back to the spearhead. Obviously, since you will be stabbing all the time, not occasionally as with swords, the head needs to be reinforced. You can't get away with something the size and thickness of a sword blade&tip.


There is you basic spear in full size.

Wednesday, 3 October 2012
On armour - advanced chainmail tools.
In the previous post about chainmaille tools, I mentioned only hand tools that you can use everywhere at any time. Even if its in the middle of the nigh, nobody will know or care since you make no noise. However that good may be though - making everything by hand is time consuming and takes a lot of effort, not to mention blisters.
Unfortunately the 99% of us will never be the Ringlord, with his custom built and unique machinery that takes uncoiled wire from one end and produced finished butted or welded chainmail from the other.
Still, that does not mean we can't save ourselves some time right?
There are 3 processes of production in chainmaille.
1 - winding coils
2 - cutting the coils into rings
3- weaving the rings.
For your average hauberk, winding the coils will take you 1 day, cutting them into rings 2-3 days and weaving at at least 1000 rings per day would end you with roughly 2 weeks of production time. Obviously it will be nice to shorten that. The easiest to do is to start power winding the coils.
You will only need a drill with a variable speed option.(The ones that power up the harder you press the button)

There are a number of various designs for coil winding sets involving a drill. You can find them on the net or improvise yourself. I myself use a piece of pipe (same I use for weapon cores actually) held in a vice. I'll show some of these later on. The result though is roughly 10 times faster winding. Basically for 1-2 hours you will wind the coils for a chainmaille hauberk or shirt which is quite the improvement from 1-2 days. As with all electric tools though, you should be careful and wear gloves and perhaps glasses, just in case.
That eliminates process 1.
Next one is cutting. the rings. Here the water gets murkier unfortunately. A number of possibilities exist.
The store bought option is the so called Ringnator its a ring cutting machine, that can work with various metal types though its best for soft stuff - aluminium, copper and so on.
It has variations that require an outside motor - a drill in this case or ones that come with their own. I know it looks like it was made in someone's garage and that's because it is, however those things apparently work and people use them. The problem at hand is the price. The Ringinator costs about 500$ and when you add shipping, it will cost you the same as buying 2-3 finished hauberks online.

To put it otherwise its a fairly major investment and that makes it unsuitable for small scale work. However if you say, are getting one for common use by your entire larp group things start to look different, assuming your group is 40-50 people, everyone donating 10 bucks for the common good doesn't sound so bad now is it? I honestly don't know whats the situation with the extra blades for this thing and how easily they wear out. There are also homemade rigs, that employ similar process of work. I'm not that much of a handyman, though if you believe you have the technical skills and know-how feel free to make one yourself.
Such rigs can also be made with a jigsaw. I've seen it work and I know it can be done but there are low points too. Jigsaws are noisy and make a lot of sparks, which means that you need a special environment to use them, you can't just set it in your bedroom, and using gloves and protective glasses is absolutely necessary. Also the discs will wear out - roughly 1 for every 4-5-6-kg of rings depending on the ring size etc. That adds extra production cost which makes jigsaw cutting less appealing.
Anyway, that's the two options I know of speeding up process number 2 - cutting the rings.
Finally we come to the last one - weaving the rings. Alas, only the Ringlord has the means to speed that one up as you can see on the video above. Only way I know of making chainmaille faster is by involving more pairs of hands in making it. If several people get on with it and separate the labour you can do quite a lot in a very short time.
Friday, 7 September 2012
The archery and homemade larp arrows tips.
Now I'm not an archer, but I got plenty of archer friends so I know a thing or two about larp archery. There are a number of things to consider about it, since it may not really be your thing and it involves a higher monetary cost than simple sword fighting. That should not discourage you of course and if you are serious about it, go ahead.
First thing to consider is the bow. You COULD try to make it yourself but pvc bows look dumb and making a real wooden bow takes experience, tools and materials that almost all of us lack. Therefore its easy to assume that when looking for a bow, the obvious choice is to buy one. For a newbie, a junior bow such as this one

is a nice start. These and similar junior bows come at about 30$ apiece and if you find out that archery was never really your thing, at least you'd save some money. They are also readily available in hunting/weapon shops and sports goods stores. If you like being an archer though, there are better options(more expensive ones too). You can buy a recurve replica online for 100-200$ and you will love it. Keep in mind that your bow should not exceed 20-25 kg of strength and that the high end is only for experienced archers.
Next thing to consider is the quiver. Due to their shape, larp arrows take more space and be a problem to manipulate. Its easy to fumble and spill your arrows on the field. Some people solve it by stacking their arrows upside down, other arrange them carefully. Whatever you choose, practice it first. Good thing about archery is that unlike sword fighting you don't need a buddy for real training. I might talk about this more later on, I need to refresh my memory on the subject.
Last but not least come the arrows. I'd suggest you buy the cheapest fiberglass arrows and that you buy them in bulk. You should start with about a dozen and be prepared to lose one every couple of games at the very least. Sometimes you'd lose more. There isn't much you can do about it, You'd send it in a tree, the nooks will break off, the feathers will fall off, someone will step on it...Losing arrows is a 100% certainty and a constant budget drain.

When making your arrows, pay attention. There are a dozen or so larp arrow guides in the net, but I guess another one won't hurt. Besides I'll mention a few specific points that might be useful.

Always cut off or saw off the arrow head. That is a must. No exceptions.
 Wrap the nook in tape to keep it in place. They tend to fall off far more often than they break off and we can't have that now can we?

Some folks and some larp games insist on using a coin to block the tip. I find it a bit unnecessary - if you are using a bow that can pierce through the bottle cap you are doing it wrong in the first place. However if its in the ruleset - use a coin to be 100% safe.

Sometimes its a cork, but plastic bottle caps work just fine and are far more readily available. DON'T just remove the tip and add a foam ball. The arrow shaft WILL penetrate through the foam.

 Most of the time, arrows are made with two layers of foam. A 3rd can be added if you think your bow is too powerful. Make sure they are bigger than an eye socket.
 Right now the arrow is ready for use, but there are a few more things we can do.

Some Aluminum tape will give it a more distinct look, and the shine will make it easier to find. If you have any bright coloured tape(orange, red etc.), use it.

In a big game, something that will really help, would be to name your arrows. This will avoid confusion and help you with recovering your ammo faster after a battle.
 Yep, now this arrow proudly states to the world that it belongs to TIMIEH!

Aand thats all folks!
First thing to consider is the bow. You COULD try to make it yourself but pvc bows look dumb and making a real wooden bow takes experience, tools and materials that almost all of us lack. Therefore its easy to assume that when looking for a bow, the obvious choice is to buy one. For a newbie, a junior bow such as this one

is a nice start. These and similar junior bows come at about 30$ apiece and if you find out that archery was never really your thing, at least you'd save some money. They are also readily available in hunting/weapon shops and sports goods stores. If you like being an archer though, there are better options(more expensive ones too). You can buy a recurve replica online for 100-200$ and you will love it. Keep in mind that your bow should not exceed 20-25 kg of strength and that the high end is only for experienced archers.
Next thing to consider is the quiver. Due to their shape, larp arrows take more space and be a problem to manipulate. Its easy to fumble and spill your arrows on the field. Some people solve it by stacking their arrows upside down, other arrange them carefully. Whatever you choose, practice it first. Good thing about archery is that unlike sword fighting you don't need a buddy for real training. I might talk about this more later on, I need to refresh my memory on the subject.
Last but not least come the arrows. I'd suggest you buy the cheapest fiberglass arrows and that you buy them in bulk. You should start with about a dozen and be prepared to lose one every couple of games at the very least. Sometimes you'd lose more. There isn't much you can do about it, You'd send it in a tree, the nooks will break off, the feathers will fall off, someone will step on it...Losing arrows is a 100% certainty and a constant budget drain.
When making your arrows, pay attention. There are a dozen or so larp arrow guides in the net, but I guess another one won't hurt. Besides I'll mention a few specific points that might be useful.

Always cut off or saw off the arrow head. That is a must. No exceptions.


Some folks and some larp games insist on using a coin to block the tip. I find it a bit unnecessary - if you are using a bow that can pierce through the bottle cap you are doing it wrong in the first place. However if its in the ruleset - use a coin to be 100% safe.

Sometimes its a cork, but plastic bottle caps work just fine and are far more readily available. DON'T just remove the tip and add a foam ball. The arrow shaft WILL penetrate through the foam.


Some Aluminum tape will give it a more distinct look, and the shine will make it easier to find. If you have any bright coloured tape(orange, red etc.), use it.

In a big game, something that will really help, would be to name your arrows. This will avoid confusion and help you with recovering your ammo faster after a battle.


Aand thats all folks!
Subscribe to:
Posts (Atom)


